5 Simple Steps
Needed Materials
1) Gro-System Pot with Insert,
2) A pair of gardening (or latex) gloves,
3) Enough SC1 Professional Potting Mix to fill your Gro-System,
4) A garden hose connected to a watering source,
5) Selected plants.
For ideas and suggestions on what to plant, see the “Flowers” and “Vegetables” menus above.
Step 1: Insert the Insert
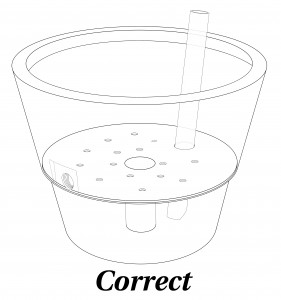
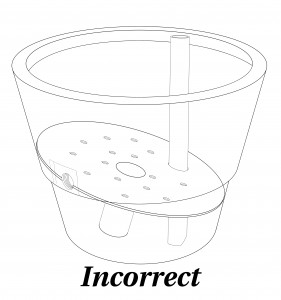
While this step may seem obvious, it is important to seat the plastic insert into the pot properly. If the insert’s edges are not resting evenly around the sides of the pot, it may move out of place during planting, allowing potting mix to fall freely into the reservoir.
Step 2: Form the Wick
To create the wick, firmly pack SC1 Professional Potting Mix down the wick tube. When this is done correctly, it will be difficult to push any additional potting mix into the tube. This step is critical for the Gro-System to bring water up to the plants from the reservoir. If the wick tube is not properly stuffed, the pot will not self-water, and it will need to be watered from the top every day. *Note: When working with this ultra-absorbent potting mix, it’s a good idea to use gloves. The ingredients tend to suck moisture from hands, drying out the skin.
Step 3: Fill the Growing Area
After the wick tube has been stuffed, fill the remaining area above the pot insert with SC1 Professional Potting Mix. The thick potting mix fibers will naturally mat over the small holes in the insert, preventing mix from falling through. Be sure to settle the potting mix snuggly, filling any loose areas or air pockets. After all the potting mix has been added, soak it up with water from the garden hose.
Step 4: Plant the Plants
Decide how the plants will be laid out. For ideas, check out “Principles of Planting Design” and “Recipe Combinations”. Carefully remove the first plant from its container by 1) turning it upside-down, 2) pressing inward on the bottom of the pot, and 3) shaking the pot gently. Dig a hole about 5” wide and slightly deeper than the root/potting mix mass of the first plant. Before planting, carefully rake the roots on the bottom and sides of this mass in order to free them from their confined space. If this is not done, roots may continue to grow around each other, strangling the plant. Next, set the plant in the hole – “green side up”. Finally, push the surrounding potting mix around it, gently “tucking it in to bed”. Continue with remaining plants, spacing them evenly.
Step 5: “Water In” the Plants
Once all the plants have been “tucked in”, sprinkle just enough water on top to settle the potting mix around the plants. If using second- or third-year potting mix, add 1 ounce of fertilizer to a gallon of water to “water in”. Otherwise, don’t add fertilizer since new potting mix comes pre-charged with it.
Warning: Don’t fill the reservoir yet. Instead, wait until the potting mix dries out a bit. If the reservoir is accidentally filled at planting time, carefully tip the pot drain spout down to empty extra water. For instructions on properly watering your Gro-System, see “Watering Instructions”. Begin fertilizing about two weeks after planting. For more information, see “Fertilizing Instructions”.


Better Quality ~
Less Maintenance